MVC
1)
디렉토리 구조 및 파일
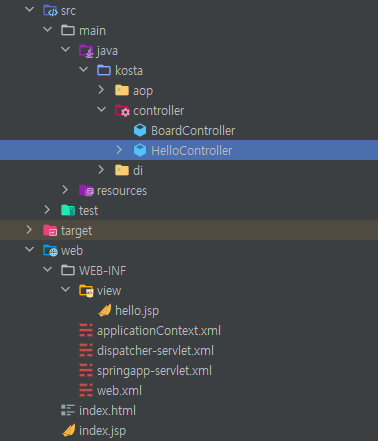
web.xml
<?xml version="1.0" encoding="UTF-8"?>
<web-app xmlns="http://xmlns.jcp.org/xml/ns/javaee"
xmlns:xsi="http://www.w3.org/2001/XMLSchema-instance"
xsi:schemaLocation="http://xmlns.jcp.org/xml/ns/javaee http://xmlns.jcp.org/xml/ns/javaee/web-app_4_0.xsd"
version="4.0">
<context-param>
<param-name>contextConfigLocation</param-name>
<param-value>/WEB-INF/applicationContext.xml</param-value>
</context-param>
<listener>
<listener-class>org.springframework.web.context.ContextLoaderListener</listener-class>
</listener>
<!--*************************************************************************************-->
<servlet>
<servlet-name>dispatcher</servlet-name>
<servlet-class>org.springframework.web.servlet.DispatcherServlet</servlet-class>
<load-on-startup>1</load-on-startup>
</servlet>
<servlet-mapping>
<servlet-name>dispatcher</servlet-name>
<url-pattern>/</url-pattern>
</servlet-mapping>
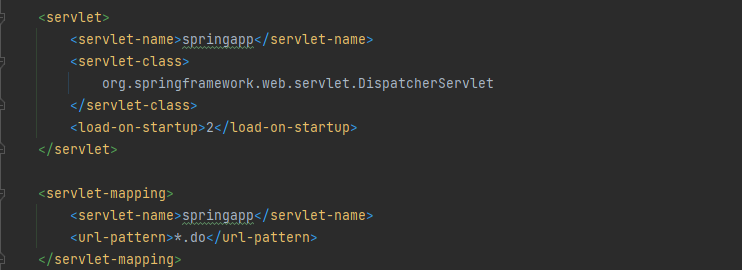
<servlet>
<servlet-name>springapp</servlet-name>
<servlet-class>
org.springframework.web.servlet.DispatcherServlet
</servlet-class>
<load-on-startup>2</load-on-startup>
</servlet>
<servlet-mapping>
<servlet-name>springapp</servlet-name>
<url-pattern>*.do</url-pattern>
</servlet-mapping>
<!--*************************************************************************************-->
<welcome-file-list>
<welcome-file>index.jsp</welcome-file>
</welcome-file-list>
</web-app>
springapp-servlet.xml
<?xml version="1.0" encoding="UTF-8"?>
<beans xmlns="http://www.springframework.org/schema/beans"
       xmlns:xsi="http://www.w3.org/2001/XMLSchema-instance"
       xsi:schemaLocation="http://www.springframework.org/schema/beans http://www.springframework.org/schema/beans/spring-beans.xsd">

    <bean id="helloController" class="kosta.controller.HelloController"></bean>
    <bean id="viewResolver"
          class="org.springframework.web.servlet.view.InternalResourceViewResolver">
        <property name="prefix" value="/WEB-INF/view/"/>
        <property name="suffix" value=".jsp"/>
    </bean>
</beans>
index.jsp
<%@ page contentType="text/html;charset=UTF-8" language="java" %>
<html>
<head>
    <title>$Title$</title>
</head>
<body>
$END$
<script>
    location.href = "hello.do"
</script>
</body>
</html>
hello.jsp
<%--
  Created by IntelliJ IDEA.
  User: JKM
  Date: 2022-05-13
  Time: 오전 11:35
  To change this template use File | Settings | File Templates.
--%>
<%@ page contentType="text/html;charset=UTF-8" language="java" %>
<html>
<head>
    <title>Title</title>
</head>
<body>
    hello.jsp
${message}
</body>
</html>
HelloController.java
package kosta.controller;

import org.springframework.stereotype.Controller;
import org.springframework.web.bind.annotation.RequestMapping;
import org.springframework.web.servlet.ModelAndView;

@Controller
public class HelloController {
    @RequestMapping("/hello.do")
    public ModelAndView hello(){
        ModelAndView mav = new ModelAndView();
        mav.addObject("message", "Hello Spring");
        mav.setViewName("hello");

        return mav;
    }
}
* 이전 수업들에서 MVC를 많이 다뤘기 떄문에 이 부분은 그렇게 어렵지 않았다.
다만 .xml파일들을 다루는게 어렵게 느껴졌고,
중간에 조작하다 발견한 에러(?)를 해결하는 과정을 통한 이해를 작성하겠다.
tomcat 서버는 실행 시 자체 config directory 내부의 설정 파일(server.xml, web.xml 등)이 default인 상태에서
application의 server.xml, web.xml 파일을 오버라이딩한 설정을 통해 실행된다.
말이 어려운데 web.xml을 통한 이해였기에 이를 통해 설명하겠다.
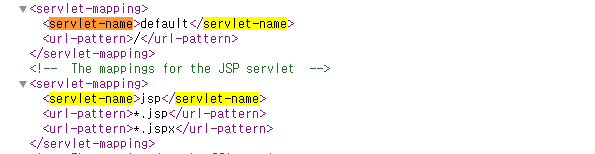
당연히 tomcat Directory의 web.xml 위쪽에 servlet-name을 설정해주는 부분이 있다. (생략했음)
WEB-INF/web.xml을 위와 같이 설정하고 실행 시 index.jsp를 tomcat 서버를 통해 실행하면 (ctrl + shift + F10)
아래와 같이 URI가 index.do로 실행된다.
이는 WEB-INF/web.xml의 url-pattern이 유일하게 *.do 밖에 없기 때문이고
index.jsp파일 내부에서 우클릭 + Modify Run Configuration을 통해 URI를 index.jsp로 전송할 수 있다.

다시 WEB-INF/web.xml을 아래와 같이 default 생성자를 dispatcher라는 이름으로 생성하고, dispatcher-servlet.xml을 통해 Spring Container에 Bean을 올바르게 생성 시, 모든 URL에 대해 처리가 가능하며 *.do인 경우는 springapp을 통해 처리가 된다.
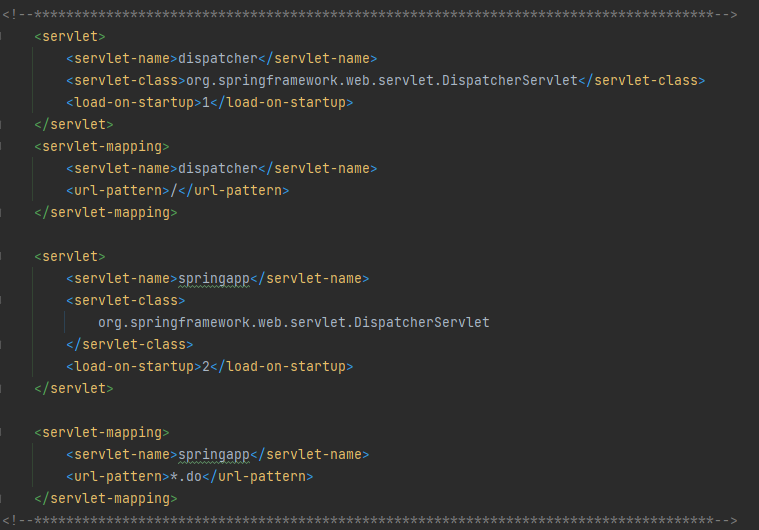
이는 WEB-INF/web.xml에 servlet 설정이 존재하기만 한다면, tomcat Directory/conf/web.xml의 모든 servlet 설정이
오버라이딩 된다는 의미이다.
'kosta > Spring' 카테고리의 다른 글
| @ModelAttribute 추가 이해 (0) | 2022.06.14 |
|---|---|
| Maven 기반 Spring 프로젝트 생성! (0) | 2022.05.18 |
| Spring 기초3(실습) (0) | 2022.05.18 |
| Spring 기초(실습) (0) | 2022.05.12 |


댓글